


Proximity Sensor for Series Progressive Valve
หมวดหมู่:
เครื่องมือต่างๆ
บริษัท เท็นริว (ไทยแลนด์) จำกัด
โทรศัพท์: 02-005-8388
แฟกซ์: 02-005-8389
มือถือ: 064-789-1461 (alex), 099-418-1511 (คุนรินทร์), 090-656-9946 (คุณพิมพ์)
โทรศัพท์: 02-005-8388
แฟกซ์: 02-005-8389
มือถือ: 064-789-1461 (alex), 099-418-1511 (คุนรินทร์), 090-656-9946 (คุณพิมพ์)
Proximity Sensor for Series Progressive Valve
Proximity Sensor for Series Progressive Valve
Specifications
| E2E-X2E1 | E2F-X2E1 | E2F-X2Y1 | |
|---|---|---|---|
| Power Supply Voltage | DC12〜24V | AC24〜240V | |
| Use Voltage range | DC10〜40V | DC10〜30V | AC20〜264V |
| Output Form | DC 3-wire NPN | AC 2-wire system | |
| Detection Distance | 2mm±10% | ||
| Setting Distance | 0〜1.6mm | ||
| Standard Detection Object | Iron 12×1mm | ||
| Protection Grade | IEC standard IP67 | IEC standard IP68 | |
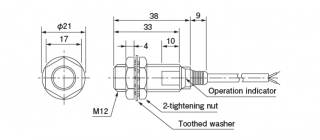
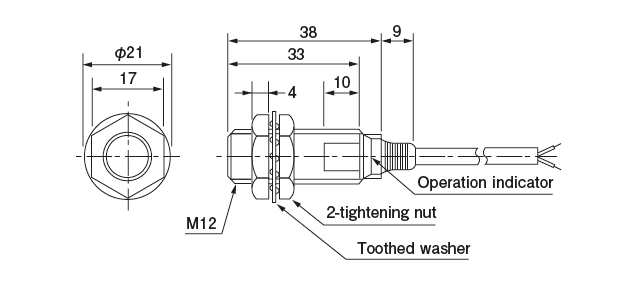
Dimensional Drawing
| Model | Part Number |
|---|---|
| E2E-X2E1 | 733225 |
| E2F-X2E1 | 730797 |
| E2F-X2Y1 | 730721 |
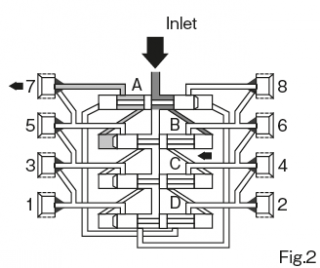
STEP 1
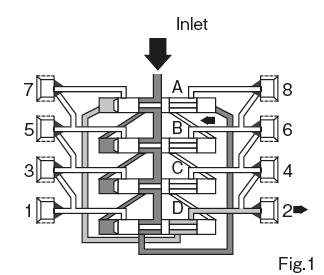
Grease that has been pumped by the pump or grease gun comes in through the inlet at the top of the block. The delivered grease passes through the darkened port to the right of the piston "A" and moves the piston "A" to the left directions. At this time, the grease on the left side of the piston "A" is discharged from the outlet No. 2 through the port shown in light color.
STEP 2

When the piston "A" strokes to the left direction fully, the port leading to the right side of the piston "B" is connected as shown in dark color in Fig. 2, and the grease from the Pump passes through this port and the piston "B" Move to the left directions. At this time, the grease on the left side of the piston "B" is discharged from the No. 7 outlet through the port shown in light color.
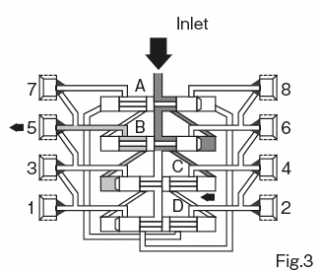
STEP 3

As before, when the piston "B" is fully stroked to the left direction, the port leading to the right end face of the piston "C" is connected as shown in dark color in Fig. 3, and the grease passes through this port , Move the piston "C" to the left directions. At this time, the grease on the left side of the piston "C" is discharged from the 5th outlet through the port shown in light color.
STEP 4
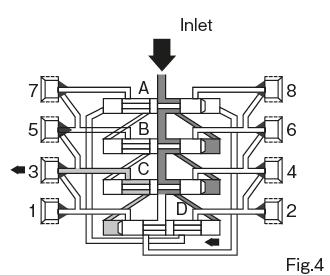
When the piston "C" is fully stroked, as shown by the dark color in the right figure, the port leading to the right end face of the piston "D" is connected, and the piston "D" is moved in the left directions. At this time, the grease on the left side of the piston "D" is discharged from the 3rd outlet through the port shown in light color.
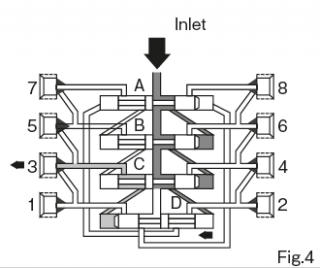
STEP 5
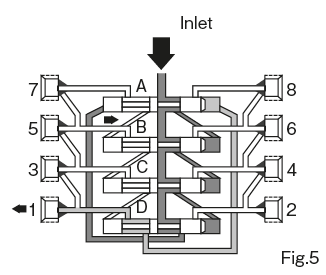
This time, as a result of full stroke of the piston "D", the port leading to the left end face of the piston "A" is connected as shown in dark color in the figure, and the piston "A" is moved to the right directions. At this time, the grease on the right side of the piston "A", which previously worked as hydraulic fluid, is discharged from the first outlet through the light colored port. From then on, grease will be discharged in the order of 8, 6, 4, 2, 7, 5, 3, 1 outlets in the same manner.
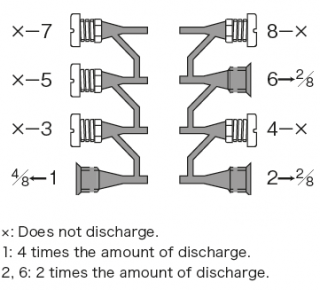
Setting / precaution of discharge amount
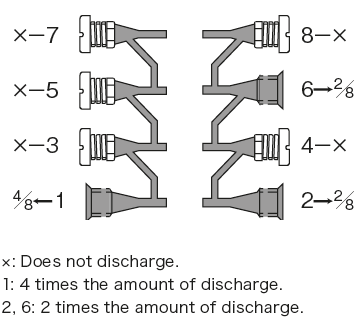
● Setting of discharge amount
Each Discharge Port discharges 0.2 ml / stroke of grease when the pump is activated. When one Discharge Port is closed, the amount of the closed part is added to the next Discharge Port and discharged. Example) Closing # 8 will discharge 0.2 ml × 2 = 0.4 ml into # 6. When # 7, 5 and 3 are closed, 0.2 ml × 4 = 0.8 ml is dispensed to # 1. In this way, you can set the required amount for the lubrication point. However, do not close # 1 and 2 as they are switching valves. The whole will not work.
● Notes
1. Only dedicated fittings should be used for Discharge Port of AP and SP type valves.
2. When installing the Discharge Port Nipple with a check of the dedicated joint on Grease Discharge Port, make sure that the bypass hole blocking ring is set. Also, when attaching a plug to Grease Discharge Port, be sure to remove the bypass hole blocking ring. If you install the plug with the bypass hole blocking ring set, the entire valve will not operate.
3. Tighten the Checked Discharge Port nipple or compression nut slightly to ensure the bypass hole blocking ring is set.
4. When screwing a dedicated joint into Grease Discharge Port, assemble it in order from the top or bottom. If you start assembling from the middle Discharge Port or skip along the way, the spanner does not turn sufficiently and can not be assembled.
5. When screwing the plug into Grease Discharge Port, tighten slightly. Also, be sure to use a new Target Washer with a new copper washer that has been used once.
สอบถามรายละเอียดสินค้า

Verified
Level 2 Saller
Thailand | สินค้า / บริการ
ที่อยู่: 149/44 ม.7 ต.บางโฉลง อ.บางพลี 10540, ประเทศไทย
แฟกซ์: 02-005-8389
มือถือ: 064-789-1461 (alex), 099-418-1511 (คุนรินทร์), 090-656-9946 (คุณพิมพ์)
เว็บไซต์: https://www.จาระบี.net
โทรศัพท์: 02-005-8388แฟกซ์: 02-005-8389
มือถือ: 064-789-1461 (alex), 099-418-1511 (คุนรินทร์), 090-656-9946 (คุณพิมพ์)
สินค้าอื่น ๆ
ดูทั้งหมด 
เหมาะกับเครื่องจักรที่ต้องทำงานต่อเนื่องหรืออยู่ในตำแหน่งที่บำรุงรักษายาก การเลือกใช้จาระบีที่เหมาะสมไม่เพียงช่วยลดการสึกหรอ แต่ยังยืดอายุการใช้งานเครื่องจักร ทนความร้อน ป้องกันสนิม หรือทนแรงกดสูง จุด
ประเทศ:

เหมาะกับเครื่องจักรที่ต้องทำงานต่อเนื่องหรืออยู่ในตำแหน่งที่บำรุงรักษายาก การเลือกใช้จาระบีที่เหมาะสมไม่เพียงช่วยลดการสึกหรอ แต่ยังยืดอายุการใช้งานเครื่องจักร ทนความร้อน ป้องกันสนิม หรือทนแรงกดสูง จุด
ประเทศ:

ทนความร้อน ป้องกันสนิม หรือทนแรงกดสูง จุดเด่นของจาระบีคือสามารถเกาะติดชิ้นส่วนได้นาน ไม่ไหลออกง่ายเหมือนน้ำมันหล่อลื่นทั่วไป ทำให้เหมาะกับเครื่องจักรที่ต้องทำงานต่อเนื่องหรืออยู่ในตำแหน่งที่บำรุงรักษา
ประเทศ:

Multemp HRL Wide temperature range EP grease containing organic molybdenum.
ประเทศ:
สินค้า / บริการที่เกี่ยวข้อง

สว่านไฟฟ้า CCS ราคาถูก
สว่านไฟฟ้า CCS ของเราผลิตจากวัสดุที่มีคุณภาพ ทนทานต่อการใช้งาน เหมาะสำหรับการเจาะทุกประเภท
ประเทศ: ไทย

รถเข็นพื้นเหล็กล้อมตาข่าย
รถเข็นมีหลายขนาด รับน้ำหนักได้ ตั้งแต่ 250 - 500 กก. ตัวรถผลิตจากเหล็ก ล้อ 5 นิ้ว
ประเทศ: ไทย
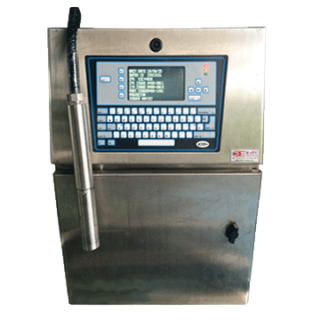
เครื่องพิมพ์วันที่ (Anyjet 43 S Plus)
Lead Jet หน่วยความจำ 32 บิท บรรจุได้ถึง 1000 ข้อความ ระบบสัมผัสหน้าจอโดยตรงทำให้ง่ายต่อการป้อนข้อมูลและสั่งการ
ประเทศ: ไทย

เต็นท์พับ EASY LIFE TENT สีแดง รุ่น T1
เต็นท์พับ EASY LIFE TENT รุ่น T1 ขาสีดำ แข็งแรง ทนทาน ต่อการใช้งาน
ประเทศ: ไทย

ปั๊มน้ำบาดาลพลังงานแสงอาทิตย์ 250W 24V
ปั๊มน้ำบาดาลพลังงานแสงอาทิตย์ 250W 24V ขนาด 2 นิ้ว ท่อออก 1 นิ้ว
ประเทศ: ไทย

เครื่องขัดพื้นแบบเดินตาม TENNANT T260
• ขนาดแปรง : 20 นิ้ว / 500 มม. • ความจุถัง (น้ำดี/น้ำเสีย) : 40/45 ลิตร • พื้นที่การทํางาน : 1,950 ตร.ม./ชม. • ชั่วโมงทํางาน : 3 ชม.
ประเทศ: ไทย
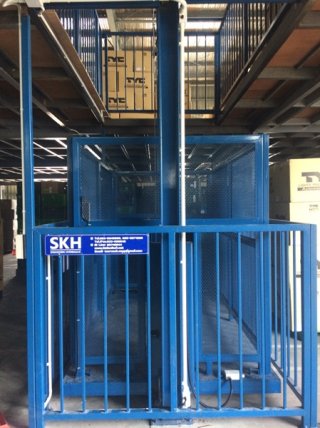
รับออกแบบ ลิฟท์ยกสินค้า
เราผลิตและจำหน่าย ออกแบบ ซ่อมบำรุง โมดิฟาย ลิฟท์ยกสินค้า, ลิฟท์บ้าน, ลิฟท์ขนของ, ลิฟท์ผู้สูงอายุ
ประเทศ: ไทย
งานตัดเสาคอนกรีต ขนาด 50x50 ซม ความสูง 10 ม
งานตัดเสาคอนกรีต ขนาด 50x50 ซม. ความสูง 10 ม.
ประเทศ: ไทย

เครื่องซีล Westpack รุ่น Westpack 200
เครื่องซีล Westpack รุ่น Westpack 200 ราคา 5,900.00 บาท ใช้สำหรับ ซีลถุงพลาสติก ซีลถุงกาแฟ ปิดปากถุง รีดถุงพลาสติก ซีลปิดปากถุง และ ซีลฟอลย์ อลูมิเนียม ฟอยล์ sealer aluminium foil ได้
ราคา: 5,900.00 THB

แฟ้มพลาสติกซองสอด A 4
รับผลิต แฟ้มพลาสติก ทุกชนิด มีบริการรับออกแบบให้คำแนะนำฟรี ทีมงานผู้บริหารประสบการณ์มากกว่า 20 ปี
ประเทศ: ไทย
Thailand Trusted SMEs ศูนย์รวม SME ไทยที่คุณวางใจ